HOME

Wednesday, January 30, 2013

Pizza Pop Tarts


These little numbers are incredibly quick and super easy to make! You must try them! Rylie(my 5 year old) would eat pizza for breakfast, lunch, and dinner if I let her. Another favorite love of hers are pop tarts. I saw a recipe for homemade pop tarts on Smitten Kitten. Then I thought about adding pizza toppings in place of the usual fruit mixture. I used refrigerated pie crusts because I just didn't have the time and my little ones were hungry:) These were scrumptious and they worked out perfectly for the kids.

First, preheat the oven to 450 degrees. I used a cookie sheet and parchment paper. Unroll one or both of the pie crusts and square the edges. I used a pizza cutter to cut the crust(s) in half horizontally and then two rows vertically, so you end up with six rectangles.

Place the pizza sauce on three of the rectangles(or six if you are using both refrigerated pie crusts). I used spaghetti sauce because this is what I had available. Leave a little space around the edges. Then sprinkle the shredded cheese and add your choice of toppings. I added pepperoni this time because this is Rylie's favorite.

Lightly prick the other rectangles (with no sauce and toppings) and place them on top of the rectangles with the pizza fixings. Seal all edges with a fork so the mixture doesn't ooze out the sides.

Bake for about 8-10 minutes or until slightly brown. Serve these with your choice of sides and the kids are set with a healthy meal! So quick and easy!


INGREDIENTS
Pie Crust, refrigerated or homemade (I used refrigerated to save on time)
1 tablespoon of pizza sauce or spaghetti sauce (for each pop tart)
Shredded Cheese (I used 2% milk Mozzarella and Provolone)
Toppings (I used All Natural Hormel nitrate-free pepperoni)

DIRECTIONS
Preheat oven to 450 degrees. Spread parchment paper over a cookie sheet. Unroll pie crust(s) and cut each crust into 6 rectangles. Add pizza sauce, cheese and toppings to three of the rectangles(or six rectangles if using two pie crusts). Lightly prick the other plain rectangles with a fork and place them on top of the rectangles with the pizza toppings. Seal all the edges with a fork. Bake for 8-10 minutes or slightly brown. These freeze well too.

Pin It

Monday, January 28, 2013

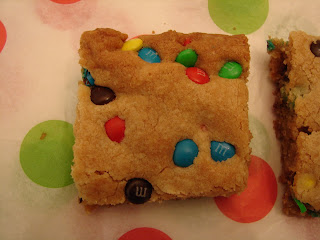
M&M Cookie Bars


These cookie bars are incredibly yummy! They are super easy and quick to make too! I was not surprised these moist and chewy little numbers disappeared so quickly even with my tough little critics running around the house:) I made these on Saturday and they are already gone. Woohoo! I will tell you that I baked them in a 9x13 pyrex dish, but next time I think I will use a smaller pan so they will be a little thicker. They are perfect for little hands, but if you prefer them on the thicker side, use a smaller pan. This recipe was adapted from the website What Megan's Making.

INGREDIENTS:
2 1/8 cups of flour(I used all-purpose flour)
1/2 teaspoon salt
1/2 teaspoon baking soda
1 1/2 sticks of butter(melted and cooled slightly)
1 cup of brown sugar
1/2 sugar
1 egg
1 egg yolk
2 teaspoons of vanilla extract
1 cup of M&Ms, divided (I used mini M&M's because this is what I had on hand)

DIRECTIONS:
Preheat the oven to 325 degrees. Adjust the oven rack to lower-middle position. Grease a 9x13 (or 9x9 or 8x8 pan for thicker brownies.

In a medium sized bowl, whisk together the flour, salt, and baking soda.

In a large bowl, whisk the melted butter and sugars until combined. Add the egg, egg yolk, and vanilla and mix well. Using a rubber spatula, fold the dry ingredients into the egg mixture until just combined; do not overmix. Fold in 1 cup of M&M's and turn the batter into the prepared pan, smoothing the top with the spatula. Sprinkle remaining M&M's on top and press in slightly.

Bake 25-30 minutes, until light golden brown on top and the edges start pulling away from the sides of the pan. Cool before cutting.

Pin It

Wednesday, January 9, 2013

Chick-fil-A Chicken Strips (Chick-n-Strips Copycat Recipe)

My kids like to eat out. When it comes to fast food restaurants, they love Chick-fil-A for their chicken strips and tenders and extremely small PLAY AREA:) I was so excited to see a copycat recipe online. These are so yummy and even have less fat than the real thing. They have been a big hit with my girls Rylie and Addie especially! Phew!

First, whisk together the milk, dill pickle juice and egg. Pickle juice? Yes, there is a rumor going around that the secret ingredient to Chick-fil-A chick-n-strips is dill pickle juice. Sounds weird I know, but these taste pretty close to the real thing.


Add the chicken strips or tenders(if you prefer), cover with saran wrap and stick in refrigerator for 2 or more hours.

In another bowl, combine flour, powdered sugar, salt and pepper. When you are ready to cook, dredge the chicken strips through this mixture. Make sure each side is covered well.

Heat 1/4 cup of peanut oil in skillet on medium to medium high heat. It is fine to use canola or vegetable oil as well. I've tried cooking them in both of these oils before. They tend to burn the chicken much quicker so you just need to be more careful.

Gently place a couple of chicken strips into the peanut oil with tongs for about 4 minutes on each side. Stove top times may vary.


Place on a couple of paper towels or a paper towel lined plate when thoroughly cooked and golden brown. Pour remaining oil in skillet and cook the rest of the chicken strips the exact same way.

Adapted from My Name is Snickerdoodle and Iowa Girl Eats.

INGREDIENTS:
1 lb. chicken breast tenderloins or tenders seasoned with salt & pepper
3/4 cup milk (I used skim)
1/4 cup dill pickle juice
1 egg
1 1/4 cups flour
2 Tablespoons powdered sugar
2 teaspoons salt
1 teaspoon pepper
1/2 cup peanut oil, divided (canola or vegetable oil is fine)

Pin It

DIRECTIONS:
In a medium sized bowl, whisk together the milk, pickle juice and egg. Add the chicken strips, cover with saran wrap and stick in refrigerator for 2 or more hours.
In another bowl combine flour, powdered sugar, salt and pepper. Dredge the chicken strips through mixture when ready to cook.
Heat half the peanut oil in a large skillet over medium to medium-high heat. You can test the oil by dropping in a bit of the flour mixture. If it sizzles, the oil is ready, if it pops, lower the temperature.
Gently place the tenders into the oil with tongs. Do this in 2 batches, as you do not want to overcrowd the skillet. Cook the chicken for 4 minutes per side. Once thoroughly cooked and golden brown, place on a couple of paper towels or paper towel lined plate.
Serve with your favorite condiment(s). Rylie's favorite is Ranch dressing.
Pin It

Monday, January 7, 2013

Baked Apple Doughnuts

My mom made these often throughout my childhood. My siblings and I loved them. It was such a treat when we would come home and they were baking in the oven. This recipe was adapted from the Beyond Parsley Cookbook-Junior League Kansas City. I made these again over Christmas break, and my daughter Rylie(my toughest critic) loved them and asked me to make her some more. So I happily obliged!

First, sift together flour, baking powder, sugar, salt and nutmeg. Cut in the shortening until the mixture is fine.

Add eggs, milk, and apples to dry ingredients. You can add the chopped nuts here if you would like as well.


Fill well-greased tiny muffin pans almost two-thirds full(sorry, no picture) and bake at 350 degrees for about 20 minutes or until golden brown.


Roll in melted butter and then in cinnamon-sugar mixture. Reheat at 250 degrees. These freeze well! I'm also working on making a more healthy version of these doughnuts and will let you know how they turn out.


INGREDIENTS:
3 cups all-purpose flour
3 1/2 teaspoons baking powder
1 cup sugar
1 teaspoon salt
1 teaspoon nutmeg
1 cup shortening
2 eggs, beaten
1/2 cup milk (I use skim but any kind is fine)
1 cup grated tart apples(About one apple with skin removed)
1 cup butter, melted
Cinnamon and sugar mixture for coating
Optional: Add 1/2 cup of chopped nuts

DIRECTIONS:
Sift together flour, baking powder, sugar, salt and nutmeg. Cut in shortening until mixture is fine. Add eggs, milk, and apples to dry ingredients. Mix thoroughly. Fill well-greased tiny muffin pans almost two-thirds full. Bake at 350 degrees for 20 minutes or until golden brown. Roll in melted butter and then in cinnamon-sugar mixture. Reheat at 250 degrees.
Makes about 6 dozen depending how large you make them. This time around I ended up with about 5 dozen. These are a great treat at home and also make great Christmas, Valentine's, and Hostess gifts packed in cute tins. Enjoy!


Pin It

Welcome!

Hi! Welcome to my blog! My name is Megan and I am a wife and mom of three kids. Rylie is 5 and I have 3 year old twins, Addie(Adelaide) and Liam(William). Addie and Liam were each born with a bilateral cleft lip and palate. They have numerous surgeries under their belt and still a few more to go, but they are doing amazing! I've started a blog because we have had feeding issues with the twins since they were born, and ALL my kids are picky eaters! We have had a ton of help with therapists and nutritionists the past three years. We have learned so much and they have come a long way. But, meal times can still be a bit stressful. There have been many times where I have made 2 or 3 separate meals at dinnertime. Can you relate? At times, it can be a little frustrating. I love finding new recipes to try to see if this one just might actually win them over completely. I hope maybe I can help other moms stressed out with their own picky eaters at meal time! And I would also like to hear about your experiences and suggestions too.

My kids love doing crafts so I'll be adding some of our creations as well. Thanks so much for visiting!